Our pets are our friends and companions for life. Even going on a road trip, we do not want to part with them even for a second. However, you can’t just put your dog in a car and drive to your destination. As dog owners, we must help them adapt to roadtrips. We must also provide them with comfort and safety during the trip.
When traveling in another country, you can not do without renting a car, so as not to worry about transporting your pet. In this article, we will talk about how to train your dog to travel in a car and how to make the trip safe.
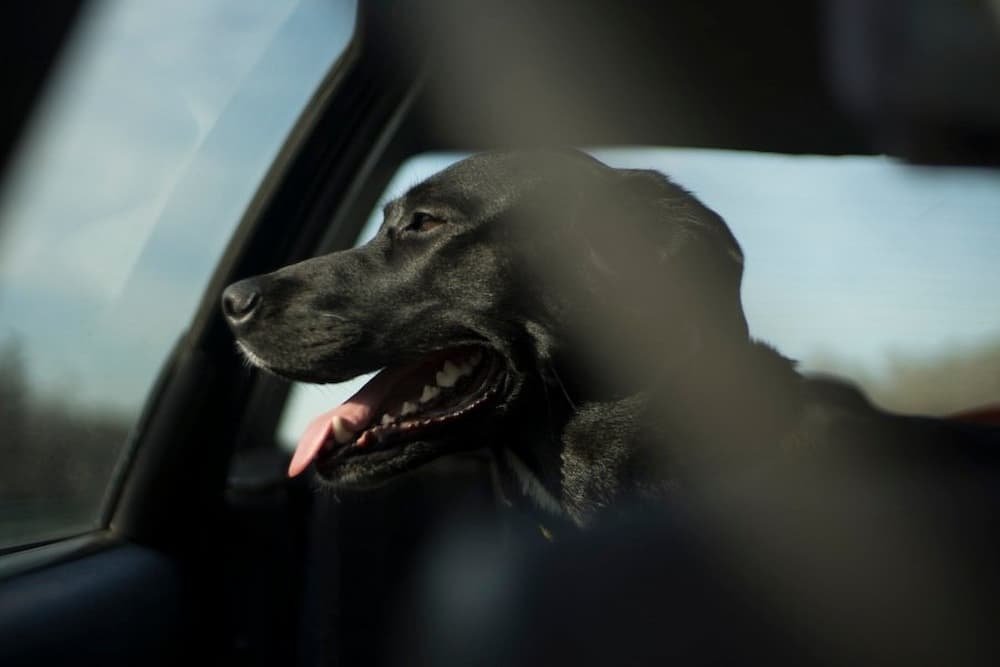
If you force the dog to get into the car and go on a road trip that will take several hours, then you will encounter a lot of difficulties and scare your pet. In this regard, it is necessary to gradually introduce it to the car and help it feel comfortable and safe inside the cabin. Here’s how to do it:

Do not allow the dog to walk inside the car while driving. Firstly, the dog may not interfere with your driving. Secondly, during emergency braking, if your pet is not fastened, then it can hit and injure itself and other passengers.
In this regard, think about how to organize security. If your dog is small, you can put it in a carrier. If the dog is large, then you should fasten it.
Dogs can experience stress during road trips. Make sure your pet can drink water while traveling. To do this, take a bowl of water, as well as food if it wants to have a snack.
It is worth remembering that some dogs can feel motion sickness. That’s why it’s probably best not to give a lot of food before the trip so it doesn’t throw up. You should also put a waterproof blanket on the rear seats to keep your pet cozy. If you have a car with a spacious trunk, then you can allocate this place specifically for the dog.

Our little friends occupy an important part of our lives. Many owners are not ready to part with them, even when going on a trip. To have a good time during a road trip, you should get your dog accustomed to car rides in advance. Also, make sure your pet is comfortable and safe.
Many pet owners agree that it’s difficult to go on long trips without their four-legged companions, as they often miss their pet’s comforting presence. This is why owners would much rather travel with their fur babies than leave them at home.
Indeed, taking a trip with your furry companion and exploring various outdoor activities can be a great way of sharing fun adventures and making meaningful memories with them. However, you should make the necessary preparations to ensure a safe and comfortable trip for both you and your pet. Without careful planning and preparation, you may encounter setbacks while traveling with your furry companion.
Regardless of what mode of transportation you use—be it plane or car—certain factors may cause your pet to feel agitated, stressed, and ill. Furthermore, many places have specific rules and regulations for traveling with pets. Failing to comply with them may lead to penalties, additional charges, or trip cancellations. If you want to better prepare yourself for these situations, below are four common travel problems that pet parents encounter and how you can avoid them:

Having a beloved animal companion go missing while on a trip is a pet parent’s worst nightmare. To prevent this from happening, make sure that your furry friend always wears a sturdy leash with a collar or harness whenever you’re out and about. Always keep an eye on your pet, and don’t leave them unsupervised if at all possible.
It’s also a good idea to attach a tag containing all your important contact information to your pet’s collar. This makes it easier for strangers to identify your pet and reach out to you, making it more likely for your fur baby to be safely returned to you in case they get lost.
Canine owners, in particular, may benefit from using custom dog collars made of high-quality, durable materials. These kinds of collars are sure to keep dogs from escaping their leashes while providing pups with maximum comfort during long trips.
Each airline has its own set of regulations when it comes to traveling with your pet. For instance, many will require you to use a pet carrier that’s USDA-approved. Without bringing the proper carrier, you may risk getting rejected by the airline while checking in for your flight.
Before you travel, you’ll also need to submit certain pet health documents and certifications depending on your destination. Each state or country has different laws and requirements for people traveling with pets, with some being stricter than others. If you fail to submit the proper documents on time, your pet is likely to be prohibited from entering your destination with you.
The best way to avoid these problems is to research all the necessary paperwork ahead of time. Make sure to check government and airline websites for reliable information on pet travel regulations. You should also schedule an appointment with your pet’s veterinarian at least ten days before your trip. This way, the vet can perform health screenings and ensure that your fur baby’s medical records are up to date.
If your pet is unaccustomed to riding in a moving vehicle, they might act out in dangerous ways as a response to stress and anxiety. They may even try to escape the vehicle and end up getting themselves hurt in the process.
Additionally, most airlines require pets to stay in a plane’s cargo area, separating them from their owners throughout the trip. Due to this, traveling by plane can be a stressful and uncomfortable experience for your furry companion.
Generally, it’s recommended that you place your pet in a carrier during car and plane trips to help them feel more secure. To prevent stress and anxiety, make sure to keep them in a spacious kennel lined with clean bedding. This will help them not feel so trapped or cramped within their carrier. It also helps to give your pet their favorite toy or item during the trip, as it can ease their stress by offering them a familiar source of comfort.
Lastly, do opt for direct flights if you’re traveling by plane, as it lessens the likelihood of your pet being mishandled during layovers. If you can’t book a direct flight, make sure to ask your airline about their pet safety practices during layovers. These are just some ways to ensure that your fur baby is safe and sound while on the plane.
Many pets are also prone to experiencing car sickness, especially during long road trips. To determine if your fur baby is fit for this mode of transportation, try taking them on shorter car trips first. Frequent and short trips are a great way to acclimatize a pet to their new environment. Once you notice that your furry friend has gotten more comfortable being in a moving vehicle, you can gradually extend the duration of your car rides.
When you’re ready to take your pet on a long car ride, do your best to keep them as comfortable as possible. You may also want to pet-proof your vehicle in case your fur baby vomits or drools excessively due to car sickness. And because vomiting can lead to severe dehydration and make your fur baby feel even worse, always bring drinkable water and a collapsible travel cup to help your pet stay hydrated.
If your pet frequently experiences car sickness despite your best efforts, make sure to consult a veterinarian about possible medications or treatments to alleviate it. By doing so, you’ll be well equipped to address your furry friend’s condition the next time it happens.
Traveling with your pet can be a rewarding experience as long as you do your research and plan ahead of time. Remember: the key to an enjoyable trip with your fur baby is to make sure that you can address all their needs and anticipate all possible scenarios. Just keep all the above tips in mind, and you and your furry friend should be just fine. Wherever you decide to go, your pet will always be happy to spend more time with their favorite person.
Travel insurance is one of those pesky items that many of us underestimate the importance of, and regret the absence of when something goes wrong during our travels. Finding the right cover, understanding the policies and meeting your budget expectations can be a tough job to complete. If you have a trip coming up and you aren’t sure where to begin with your travel insurance, use this guide to help plan your protection.

Travel insurance is like a lot of other insurance covers, there are so many providers and they all offer a little something different. There are basic covers and then there are comprehensive travel insurance credit cards. You might be looking for the best cover available, or an option that you can tweak based on the type of holiday you’re embarking on. No matter what kind of cover you are after, it pays to do your research.
Scan the market and find out what each provider offers and whether it’s right for you. If one policy covers skiing or snowboarding and you’re off on a tropical holiday, then that probably isn’t the cover for you. Make sure you check the varying levels of cover each provider offers as well, as they are all likely to have policies at different price points with different inclusions.
An effective way to ensure you're getting the best value and coverage for your specific needs is to actively compare travel insurance options using dedicated comparison websites or tools.
One of the best ways to protect yourself while you travel is by knowing exactly what activities you are going to be doing when you’re away. Take the time to plan your itinerary and think about the activities you are interested in doing. Then you can find the right protection policy that will cover you should anything go wrong. Planning your trip around the type of cover you may need may not seem like the most fun thing to do, it will potentially save you in the long run though. Knowing you’re covered means you can enjoy your holiday without the lingering fear of what might happen if something were to go wrong.
Let’s say you arrive at your destination and your luggage has gone missing, which does happen quite often. Knowing exactly what the claim process is on your travel insurance will mean you know exactly what you can and can’t do in that scenario. Policies will vary in the dollar amount and time frame required for your luggage to be lost before you can purchase new clothing items that you can claim.
An example would be if a policy states you need to wait a full 24 hours without your luggage before you can purchase and claim items. Take the time to learn your policy’s claim process, the rules it includes and how that may impact your travel. Once you understand the policy and its intricacies, you can travel reassured you know exactly what to do if something goes wrong.
It may not seem important, but the area you’re traveling to matters when it comes to travel insurance. Insurers will consider a number of determining factors before putting a policy together. Things like the healthcare system in the destination, the risk profile of the area and many other elements go into determining the price of the policy and the rules that govern it. Think carefully about your destination in these ways and you’ll be able to better plan for your travel protection.
Travel insurance is something every traveler should invest in before they go on any holiday. It doesn’t matter how big or small your trip may be, protecting yourself against unforeseen scenarios is incredibly important. It means you can relax and enjoy your holiday knowing you’ll be looked after should something go wrong. To better protect yourself on your next holiday, use this guide to plan your travel protection.
An immigration attorney may not necessarily speed up the process of getting your green card, as there is a lengthy waitlist that no attorney has the power to reduce. However, they can significantly reduce the chances of having your application delayed or denied.

A bureaucratic backlog contributes to the amount of time that you will wait to hear a decision on your application. If you are applying for immigration, you can check the status of your application online and find the current average wait times for different applications. In order to see the average wait times, you need to go to the Check Case Processing Times page. If you have already submitted your application, then you will check the Case Status Online page.
Another reason why the timeline for your green card or visa may be longer is due to annual limits that affect visa availability in certain categories. An example is if you are trying to immigrate with your family using a family-based visa but do not have an immediate relative who is a US citizen sponsoring you. In that case, you and your family would then be considered part of a “preference category,” which is subject to annual limits. There are also annual limits on employment-based green cards, which are based on the date that your I–130 Petition or labor certification was filed.
Immigration lawyers know these limits and can explain which ones apply in your specific case. Depending on what country you are trying to immigrate from, the reasons you are trying to immigrate, and who you are bringing with you (e.g., dependents or a spouse), you could be subjected to various wait times. It’s best to do your research early on so you know how long to wait.
Obtaining a green card is an important goal for many immigrants. People make some common mistakes when filing their immigration paperwork that inevitably delays their application or cause it to be completely rejected. One of the best reasons why you should hire an immigration attorney is so that you avoid these common mistakes:
A San Diego immigration lawyer represents the individual who is trying to immigrate to the United States or helps leaders of foreign businesses open their doors in the U.S.
Immigration law can be notoriously complex, which is why it helps to have an immigration lawyer speaking on your behalf, looking out for your interests and guiding you throughout all of the steps in the process.
A few years ago, drone videography was something unimaginable for travelers. But today, one in two uses an iron bird to take breathtaking footage.
However, shooting with a drone with a camera is not such an easy task – the time of the flight is limited, the wind knocks out focus, and it is often difficult to come up with an original idea. Such problems are of concern not only for beginners but also for those who have been engaged in this occupation for a long time. Today, we will look at some tips on drones, and of course, talk about how to edit the footage in a powerful video editor.

There are quite a few drone videos on the Internet, but they all differ little from each other.
How do you shoot the best drone videos in a way that makes you stand out from the crowd?
One of the most common mistakes beginners make when making drone shooting is flying too fast. To avoid jittering in the frame, give preference to slower and smoother movements of the gadget. This will make the frame especially clear. Remember that you can always speed up the video using special software, which we will talk about below.
Avoid sudden movements when flying. Don’t change the direction of the camera too quickly; it will prevent you from taking a good shot and create a feeling of chaos. Even the best camera quality won’t change the situation.
The same rule applies here as when shooting a photo: shooting one hour after sunrise and one hour before sunset will give you the best result. At sunset and sunrise, shadows are clearly visible, which will help emphasize relief that is invisible during the day. Moreover, there aren’t many people filming at this time, and this will help you stand out from the crowd.
Although many quadcopters for shooting are designed to fly at wind speeds of up to 11-15 meters per second, the quality of the video will not please you. Due to strong winds, the footage will “shake” and get blurry and indistinct. Therefore, it’s better not to shoot in winds greater than 9 meters per second.
Want to get the wow effect of a real Hollywood movie? Circle the drone around your subject. You can move it in a circle to the right, keeping the object in the center, and then rotate in the opposite direction. However, it should be borne in mind that in order for such shots to look professional, you must first practice making perfect circles with the drone.
Do you want your video to be catchy and stand out from thousands of traveling videos? Then you should shoot the object from the quadcopter, using several directions of movement at once. Various combinations in flight will give your movie an interesting effect.
Moving away from the object is a rather interesting and non-trivial approach. This will help you capture more detail in trees, people passing by, hills, and buildings in the frame. However, you will have to adapt to unusual control and make sure that your iron bird won’t get stuck in some super-tall pine tree.

So, the video filming with the drone is over. Now it remains to create an edgy and engaging video from the footage. If you have planned the script ahead of time, shot clips with clear timing and high quality, you just have to merge everything out. As the majority of drones with cameras have MP4 format, you can use one of the top MP4 joiners. And don’t forget to apply a voice-over with storytelling.
If you need more video editing than just stitching clips, choose a professional video processing program that can work with high-resolution files. We will now list the best options.
Adobe Premiere Pro is almost a perfect tool for any post-production or editing process of your footage. It should be noted that this program is used by many well-known experts in the film industry.
A significant advantage of this program is its free integration with other Adobe products. Most professionals use a bundle of Premiere Pro + After Effects + Photoshop. Such a software package solves almost all problems that a professional worker or a simple video lover may face.
Many people think that the program interface is complex, but in fact, it is as convenient and as intuitive as possible. Moreover, trimming can be done with a couple of clicks, and all operations in the program can be performed using hotkeys. Premiere Pro is very stable in its work. You will almost never encounter program crashes or freezes. You can enumerate the advantages of Adobe Premiere Pro for quite a long time, but it is still better to move from "theory" to practice and evaluate Adobe in practice.
If you own at least one Apple device, you’ve probably heard of iMovie. For Mac owners, we recommend starting with this program before installing third-party free video editors.
The iMovie interface is minimalistic, and in terms of its functionality, this editor will completely satisfy novice users, as well as those who have little experience in editing in primitive linear programs. There are 2 video tracks available in iMovie, which means that you can combine two different videos in one frame using, for example, the split-screen effect, the picture-in-picture effect, or simply by overlaying one video onto another.
You will also find a selection of themed video templates, pre-configured title templates, many transitions, and effects. Working with files in iMovie is very easy since most operations are performed by a simple method of dragging and dropping objects from the library onto the timeline. For those who have never used this tool, YouTube has detailed instructions.
The pre-installed Windows tool is a pretty useful editor for photo and video materials, an assistant for creating slideshows and colorful videos using effects and filters. Even a beginner can master it. The menu contains a toolbar, a project preview window and a timeline. After choosing the necessary media file, you will be presented with a wide range of editing tools, from soundtrack addition to creating slides from your favorite photos and applying effects.
Final Cut Pro from Apple is one of the best video editing tools used by professional filmmakers. The basic interface of the program is very similar to the free iMovie app, which makes it easy for Apple users to transition from an entry-level editor to a professional one.
To get started, just drag the video onto the timeline. The clips in the program are organized into so-called Roles, which categorize videos into different categories. Editing here is quick and easy.
GoPro Studio was launched by GoPro company itself to offer an available drone editing tool. It includes many filter presets and many great features like transitions, slow-motion, speeding up, and merging.
Directly from GoPro Studio, you can upload your video to YouTube, or any video storage. One of the best things about this software is that it can be run both on Windows and Mac and can be used by GoPro users for free.

It’s not that hard to create an immersive drone video. All it takes is good equipment, practice and drone control skills. And the video editing tools will take care of the quality of the source material. Download the suitable program right now and edit your videos in a few simple clicks.
Do you know how to properly care for your caravan awnings? They don’t come cheap so it’s best if you know how to properly maintain them to ensure that you get the most out of your money and that they last for years to come. They are durable accessories that demand very minimal maintenance so you shouldn’t feel overwhelmed at all. This article is for you if you’re clueless and you want to know everything that you need to cover in maintaining your caravan awnings.

If you don’t have a repair kit yet, then consider this as the sign to get yourself one. An owner of caravan awnings must always have a repair kit. A repair kit for caravan awnings must always come with the following:
Having a repair kit is important because it will ensure that you get to enjoy your caravan awnings whenever and wherever. With one, you’d get to easily fix small damages. You should never forget to bring your repair kit with you. Remember though that repair kit solutions are temporary. You still need to come up with permanent solutions to awning damages once you get home.
You have to know the proper way to set up your caravan awning. Proper set-up will ensure that you get to avoid damages and tears. Do the following once you’ve arrived at your destination:
Exert effort in removing old pegs, stones, and other materials that may damage your awning. Ensure that the place is clean and safe for your awnings. You should be doubly careful if you’d be using a groundsheet. Ensure that no sharp objects are present.
You should always ensure that the positioning of your storm straps and guy lines is correct. Your fabric should have enough allowance for comfortable flapping to avoid tearing and damage. Don’t pitch too tightly as it will only cause excessive stress to the fabric.
Your guy lines need particular care that weather and temperature can easily affect them. To ensure that everything is a-okay, always check your guy line’s tension. Do this every time you experience a significant change in temperature and weather.
You should be fully aware of the direction where your pegs are pointing. They should always be positioned in such a way that they cannot be easily pulled from the ground. You should also ensure that your guy lines don’t slip off.

Remember to observe the following tips when cleaning your caravan awnings:
1. Never use a washing machine in cleaning your awning.
2. Always clean your awning with light hand washing.
3. Use a specialized cleaner for caravan awnings. Ordinary detergents and cleaning products won’t do as they may damage its waterproof build.
4. If you don’t have a dedicated cleaner, you could simply use warm water.
5. Always use a soft-bristled brush when removing dirt from your awning.
6. Dry your awning under direct sunlight.
7. Air dry your awning if possible.
8. Always ensure that your fabric is completely dry to avoid the growth of mold and mildew.
PRO TIP: It’s easier to clean your caravan awnings when they are fully set up. This is because you’d get to easily reach every nook and fabric.

Should you ever need to deal with mold and mildew on your awnings, do the following:
1. Contact your manufacturer and inquire if they have specific product recommendations for mold and mildew removal. You need to do this because not all awnings have the same materials. Regular awning cleaners won’t also suffice if you live in a humid area and mold and mildews are recurring problems.
2. If none is recommended, you can make a safe homemade solution of your own.
Follow this recipe:
Place the solution in a spray bottle for easy application. You should let the solution dry on the affected areas before washing it off. Wash off with water. Dry it under direct sunlight to fully remove all traces of mold and mildew.
You will need to reproof your caravan awning over time. This is to ensure that it stays waterproof and durable. To do this, you simply need to apply reproofing liquid after a thorough cleaning and drying session. Reproofing also helps in the prevention of mold and mildew growth.

When storing your caravan awnings, always remember to observe the following tips:
1. Strictly ensure that your awning is completely dry before actual storage. A moist awning will be a perfect breeding ground for mold and mildew. Avoid this at all costs by opting to dry your awning under direct sunlight. Air drying is best.
2. Uninstall your caravan awning during winter. This is to avoid mold and mildew build-up.
3. Know the material of your poles. If they’re made of aluminum or steel, you should use silicone or wax polish to prevent them from rusting. If your poles are made of fiberglass, a damp microfiber cloth should be used to wipe them clean before storage.
Travel blogs have become incredibly popular over the years. Every month, new bloggers appear on YouTube who want to surprise users with their vision of the world.
The popularity of YouTube travel videos is because they engage viewers and completely captivate their attention. Videos take the viewer on a journey through an overwhelming experience that includes visual movement, sound, story, and personality.
According to the latest statistics, 2 out of 3 people who plan to go on vacation will watch travel videos about the country they want to visit.

In this article, we will share with you where to start, how to shoot travel videos, how to write a script, edit a video, and promote it on Youtube.
Also, it can be useful to watch other popular travel blogs to learn from their experience. If you'd like to learn even more, check out our guide - How to Create Compelling Videos.
Before you start coming up with the concept of your video, you need to use a trip planner, choose locations and draw up the timing and number of shooting days.
To stand out from other bloggers, you should either choose an exotic country that tourists do not travel to so often and unleash its full potential. Tell people about some unusual backgrounds they can see, visit and enjoy the trip.
Also, you can shoot your video about a country that tourists often travel to, but to surprise the audience, you need to think over a unique route and tell about untrodden routes.
Make a clear plan of what you will shoot at each location and how long it will take you to understand the time frame of your trip. You will be able to buy plane tickets in advance, rent a car and book accommodation.
When you have already decided where you will go and what you will be filming, it is time to pack your bags. The main rule of travelers is to take as few things as possible. You will need to go around a huge number of locations in a day, and a bag with heavy camera gear can significantly complicate your task.
Large cameras take up a lot of space and weigh down your bag. Great travel options are GoPro and other action cameras. They are compact, easy to install, and they shoot high-quality videos.
If you want to shoot a video from a bird’s-eye view and show an unforgettable view from the location, then take a drone. Before traveling, make sure you have a license and that the drone can be used in the location you want to capture.
To save space, choose a pair of versatile lenses that are suitable for a variety of video formats and locations. Moreover, you can read experts’ tips and organize your equipment.
To write a script that will impress users, you need to think about what goal you are pursuing and in what format you want to shoot a video.
Vlogs are usually long videos of your trip to a country. Most often, they are shot in selfie mode. The purpose of such a video is to build communication with your subscribers as you share a part of your life. Be natural, and you will build a strong connection with your subscribers.
The purpose of this video is to introduce your viewer to different locations. You can choose the top unknown places or the best cafes and restaurants. The main goal is to inform the audience.
Typically, the purpose of such videos is to educate your viewer. For example, you want to talk about entertainment, or you specialize in gastronomic locations. You need to decide on the niche to which you will devote the topic and captivate subscribers with your passion.

To better capture video clips and convey a complete vision, you should start shooting your video in the morning or before lunch. At this time, the frames are more saturated, and there are no shadows. Moreover, arriving early to the shooting location, you will have time to capture all the necessary shots before the tourists rush in.
It is important to show how you interact with the local population and how you pass through mesmerizing locations. This approach will allow you to convey your emotions and feelings.

First, you need to choose a program to edit your video. The most common are Adobe Premiere and Final Cut.
Next, you need to choose the musical accompaniment. Music can either spoil the impression or, on the contrary, add the desired atmosphere. Before using music, make sure that you are allowed to insert it into your video or get a license.
When shooting videos in different locations, background sounds will be heard. Somewhere they may be appropriate, but if you are leading your story, and behind the scenes, someone is shouting or talking loudly, then this can spoil the impression of your video. You can use the background noise removal app.
Add titles, where you will indicate the names of places, people with whom you are talking, and various statistics. When creating titles, use a font that does not overlap the content and is easy to read.
It’s best to upload your videos as “Personal.” This can help you set SEO optimization, where you can write the description, title, keywords, and tags.
Optimization settings can allow you to target your video. Thanks to this, more people will see your video.
When adding keywords, use words that have a high frequency. It is also better to use keywords in the headline, but it must be done in such a way that the headline still grabs attention.
In the description, also use frequent keywords, and do not forget to include links to your profiles on other social networks.
After optimizing your YouTube video, you need to start promoting your video and channel.

This YouTube travel video action plan can help you start filming your travel videos. Remember to think ahead and promote your video using the optimization and features that YouTube provides.
Backpacking is a wonderful way to see the world and gain new experiences. In addition to exploring new places, cultures, and cuisines, you also learn to be more flexible and confident. And of course, you’ll probably end up making friends from all over the world!
While a backpacking trip promises a lot of fun and adventure, certain blunders can turn this experience sour. In this post, we’re sharing common mistakes you should avoid. Let’s dive in.

We understand that you want to be prepared for every possible situation, but that doesn’t mean it’s okay to pack more than one bag. At the end of the day, you have to carry all your luggage around. Since you would be moving so much, it would be best to bring just one high-quality backpack.
You probably can’t spend a fortune on fine dining experiences when you’re traveling on a tight budget. However, not eating a healthy diet can take a toll on your energy levels. Try your best to eat fresh fruits, vegetables, and whole grains.
If you’ve been backpacking for months, you may experience travel fatigue. While constantly traveling and staying in cheap hostels is certainly fun, it can also be extremely tiring. And who wants to feel exhausted after a trip? We suggest ending your backpacking adventure by treating yourself to decent accommodation. Check out vacation rentals in South Carolina, and you can split the cost with your travel companions and enjoy a more luxurious pitstop.
Canned food is no doubt cheap but also heavy. Rather than making your backpack unnecessarily heavier, pack nut butters, dehydrated oatmeals, protein bars, and other ready-to-eat meals. These are not only lighter in weight but also easier to pack.
There’s no harm in being frugal but not at the expense of once-in-a-lifetime experiences. When will you ever get to eat handmade pasta in Rome? Or dive deep into the Great Barrier Reef while sailing the Whitsundays — every backpacker should know when to splurge and when to hold back.
Guidebooks were surely helpful, but you have a smartphone now. Unless you’re planning to go off the grid, we suggest skipping guidebooks for a lighter backpack.
Whether it’s cloudy or snowing outside, you cannot skip sunscreen. Yes, you read that right. Sunscreen is not just required for sunny weather. It’s actually important to wear sunscreen all year round. After all, the last thing you want is a painful sunburn. So slather yourself in sunscreen every morning and reapply it every two hours.
Sure, you can try traveling solo, but who doesn’t love company? It’s okay to have reservations about talking to strangers. However, we urge you to step out of your comfort zone and interact with other backpackers. In addition to being a lot of fun, backpacking in a group is also much safer.
From a coat to hiking boots, buying cheap gear can end up costing you significant discomfort. Do you really want to spend the night in the freezing cold without a well-insulated sleeping bag? Don’t hesitate to invest in high-quality backpacking gear, which will probably last you a lifetime.
Many foreign countries have two different price points for locals and tourists. So don’t be surprised if retailers are asking you to pay obnoxious prices for small trinkets. That being said, never buy anything without haggling. Trust us, you will just pay a fraction of the initially quoted price by standing your ground and negotiating relentlessly.
Backpacking can open your mind to new possibilities and potentially change your life. So what’s stopping you? Book your tickets today!
Traveling can be an amazing experience. You get to explore cultures, languages, and environments that are completely different from the ones you’re accustomed to. It expands your worldview and perspective on what life is about and how best to live it.
However, traveling can also be intimidating. There’s a lot that goes into the planning and execution of a successful trip. From coordinating transportation and managing bookings to figuring out what to do and how to do it within your budget, traveling can be a lot of work even for an experienced traveler.
But the benefits of exploring new places, people, and experiences far outweigh the work that goes into making them happen. By taking advantage of a few tips and tricks, beginners can ease their way into becoming expert travelers.
Staycations or day trips are kind of like travel trial runs. You’ll still get the fun of a vacation and go through the motions of planning your itinerary, coordinating bookings, and navigating some unknowns, but with significantly minimized risk. Whether you forgot your prescription in your medicine cabinet, didn’t print your tickets for the show, or if any number of little unexpected complications pop up, it’s no problem. You’re not a plane ride away from home. Additionally, problem-solving becomes a lot easier when you’re in a familiar place. Trust us, taking a wrong turn in your home state is much less traumatizing than taking a wrong turn in an unfamiliar city where the street signs are in a different language.
Whether you pick a boutique hotel in your hometown that you’ve always wanted to stay in or decide to venture to a neighboring county, vacations that are close to home can be just as fun and exciting as crossing a border.
As any experienced traveler will tell you, you just can’t do it all. When visiting a new place, most of us want to see and do everything. When will you have the opportunity to be there again? It’s true, that traveling requires the use of limited resources. But trying to do everything will leave you feeling like you did nothing. Instead of going through your list of things you want to do and trying to choose between 10 “must-dos”, choose a theme to help you curate a memorable trip.
From food and drink to history and culture to health and fitness, there are so many ways to tailor a trip to your specific interests. This technique can even help you decide on a location if you haven’t gotten that far yet. Super into vino? Taste your way through California’s wine country complete with behind-the-scenes winery tours that let you squish some grapes yourself! More of a cowboy at heart? Head to the wild wild west to explore ghost towns, eat at steak houses located on cattle ranches, tour abandoned coal mines, and drive through the desert’s beautiful national forests where you might just see some wild horses roaming between the saguaros.

Cruising is the most foolproof type of travel there is, and it is a great place to start for those without a lot of traveling experience under their belt. The best locations, excursions, and activities are all pre-planned for you, the meals and transportation costs are all built into the upfront price, and there is no such thing as taking a wrong turn. In short, cruising is easy.
While there are cruises nearly anywhere that there’s water, Alaskan cruises are ideal choices for beginner travelers for a few reasons. For one, Alaska feels like you’re traveling abroad with an other-worldly experience set in a landscape unlike any other place in the States. However, a lot of Alaskan cruises do include stops in Canada. Under WHTI guidelines, cruisers who are U.S. citizens and have both a government-issued driver’s license and birth certificate can travel sans passport. This is a big plus for those who are just starting their adventures and want to get their feet wet as international travelers.
On top of the simplicity that Alaskan cruises provide, it’s also a great option for groups. Activities and entertainment for all ages and interests are designed into the ship itself, so even if you have a companion with zero interest in getting off the boat, he or she will still be having a great time on board while everyone else explores the ports. On-board casinos, spas, pools, a variety of restaurants, lawn games, theatres, and even libraries and nightclubs will ensure everyone in your group will be endlessly entertained.
How you choose to travel will definitely impact how smoothly your trip goes, but what’s more important is that you choose to travel. There are so many benefits to gain from traveling, and there’s so much world out there that can change what, how, and why you do things in your everyday life. Traveling is just as much about discovering the world around you as it is about discovering yourself — how you manage stress, how capable you are, and the values that really resonate with you and not just the culture you grew up in. Don’t let the fear of the unknown stand in your way of finding all that there is to find, especially when there are so many easy ways to get started.
So you’ve decided to go on a road trip in your new car!
Maybe you’ve invited friends along for the ride or maybe you just want a really long drive with your family. The idea sounds incredible on paper, but the reality of spending several hours on a road can fail to live up to your expectations.
So many people have had their fair share of boring, uneventful road trips that the mini-vacation is getting a bad rep. But if you plan it just right, you can make the road trip feel incredible. Here is our list of tried and tested ideas for long road trips – whether you’ve got adult passengers or small children in tow, there’s so much you can do.

Podcasts are great for long drives and road trips. You can choose from a dizzying selection of thought-provoking podcasts that are being produced around the world. But the freedom to choose from such a wide variety of imaginative podcasts can feel a bit overwhelming. Our favorite is Ear Hustle, a nonfiction podcast about the life of incarcerated people and what happens once they return to society.
These stories can be every bit as funny as heart-wrenching and difficult. The perfect recipe for a fun road trip!
Once you’ve finished listening to a podcast, take away the most interesting concepts and discuss them with your friends. You may find engaging topics to talk about – some of which can get rather heated and keep you occupied for hours.
Whether you need something to entertain everyone or keep your kids from going bananas, a roadworthy audiobook will keep everyone occupied. Besides, books tend to be long and you can’t finish them in one sitting – perfect for a road trip. This is a great opportunity to share the experience of great writing. From bone-chilling mysteries to laugh-out-loud comedies to fantasy and science fiction, you can choose from a wide range of entertainment options! Happy listening!

No road trip is complete without an upbeat playlist.
Before you leave for the road trip, make sure you have compiled a selection of your favorite tunes. This list could include rock and roll, classics, R&B – anything that can keep you and your lot occupied. The best part about preparing playlists is the input you get from friends. This is a great way to hype up the road trip.
Or you could go for a pre-made playlist for road trips. There are several playlists you can check out on YouTube, Soundcloud, and Spotify. Simply search, “road trip tunes” and you’ll find playlists that are full of exciting music.
With Netflix on your phone and the TV on your laptop, you can binge-watch your favorite series and films as time passes by in a flash. The experience is even better if you watch the same film or TV show with friends.
Your driver will obviously have to sit this one out. They have to concentrate on the road while you can escape to your TV fantasies. Make sure to keep the driver company too or take turns driving.
Telling fun stories to each other is a prerequisite for a memorable road trip.
Besides, when was the last time you told someone a story? It will make you feel like a kid again. The long road trip is the perfect opportunity to exercise your creativity in front of friends and family.
Plus, stories are nice for the driver as well. They can focus on the road and stay entertained.

Co-op games on your phone are an excellent way of staying engaged on long road trips. There is no shortage of games on the phone such as Words with Friends or License Plate Poker to keep everyone occupied.
Chances are, everyone knows about the tunes in your playlist – but you can’t say the same for what’s on the radio. Turn the radio on and change stations until you hear a familiar beat, and see who can name the song first. Do this as many times as you like.
Don’t forget to take photos and videos for friends and fans on social media! Most people will pull their phones out at every opportunity on the road trip – and it’s the perfect way to record the amazing things you see.
You can also spice things up by challenging each other with photo competitions to see who snaps the best pictures. There are so many ideas.
And if you really want to take the best pictures, you may want to bring a dedicated camera for the road trip. Mix up the camera’s mounting positions and angles to keep things interesting. A GoPro camera can also come in handy due to its small size.
Sure it seems antisocial to stay glued to your phone screen on a road trip, but there’s no denying that social media can provide another outlet for endless entertainment.
Or better yet, why not create a separate Instagram account to document your trip? You could even share the credentials with your friends and everyone will get an opportunity to upload the photos and videos.
Loved ones back home, and even fans, can check in on what you are up to. Plus, you never know if you’re on the cusp of something big!
Pro tip: Don’t forget to keep your phone and other electronic gadgets charged up. These days, cars like the Hyundai i30 come with wireless charging to keep your electronics fully charged up.

When was the last time you sat down with your friends and family, and really opened up to each other? Use this road trip as an opportunity to reconnect with one another. Ask them about life, future plans, and other thought-provoking questions that require deep introspection.
We hope we’ve given you tons of ideas to pass the time on a long road trip. Whether you’re driving with friends, family, or doing it alone, there are many ways of making your getaway fun and memorable.
